clear sky chart

Job 9:9

Job 9:9-10
9 He is the Maker of the Bear and Orion,
the Pleiades and the constellations of the south.
10 He performs wonders that cannot be fathomed,
miracles that cannot be counted.
NIV

Sunday, December 29, 2013

3 Days of Imaging

Actually had a little bit of scope time the past few days.  The sky was clear and the seeing was excellent on 12/25.  I had the 8" out and imaged Jupiter.  Finally I got the red spot.  Its a lot darker this tear.

When I was focusing, I used one of Jupiter's moons, and noticed a good deal of coma, but it was too cold and didnt have the ambition to collimate.  I shot video anyway.  Still got some good pictures.  This was the first image, shot an hour or 2 before the GRS started rising.


This next image was shot after the red spot came into view.  I used the mjpg codec in the camera.  I wanted to see if I could detect any sort of visual difference between mjpg and IVUV.  There is a minor improvement with ivuv as you will see.  This is the mjpg image:


And this next image is the ivuv image.  It seems to be a little cleaner and the contrast seems a little better with a tiny amount more detail present.


 Not too shabby for a scope slightly out of alignment!


Now for some narrowband deep sky stuff.

These are from 12/26.  I did something a little different.  I used the guidescope as the imaging scope, plus I used the focal reducer, which I dont think does much good widening the field.  It also introduces coma.  You'll see it in some of the brighter stars.

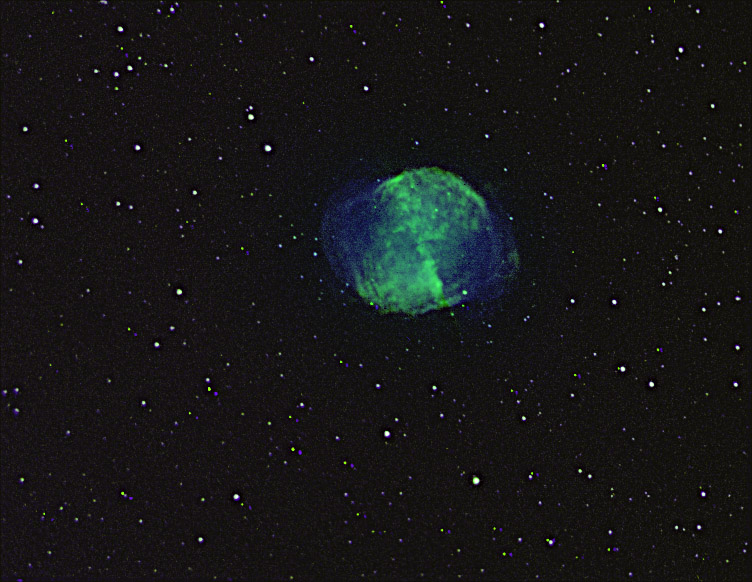
I never was able to image the Heart & Soul Nebula.  I couldnt fit it in the FOV of the main scope even when using the dslr.  Interesting that I was able to do something with the CCD and guidescope.  The Soul Nebula was shot first, and was able to fit the entire nebula in one frame.  These images were shot in Hα only.  First the Soul Nebula:

 You can see the fan shaped brighter stars in this image.  This is being caused in the reducer.

Next is a 2 panel mosaic of the Heart.  Its a bit bigger than the Soul.

If I get the chance to image this again, I will try doing it without the reducer.

Then, on 12/27 I had the scope out for a nicely clear sky.  However, the seeing was pretty bad.  I did attempt to shoot Jupiter, but it was really very bad.  After seeing this, I came in for a couple hours to wait for Orion to rise high enough to try to get the core of M42.

I was using the 8 inch, unguided.  I shot some 30 second exposures in Hα which came out quite bright.  Here is a nice closeup in Hα:

I shot a series of 10 second exposures  after shooting the above image because about half of the 30 sec frames were bad due to periodic error and slight wind.

The 10 sec exposures were almost as good as the 30 sec exposures, so I shot 30 - 10 sec in Hα.  I shot in all 3 narrowband wavelengths.  10 sec in Hα, 10 sec in Oiii and 15 sec in Sii, 30 frames each.

For some reason, my Sii frames I had a lot of bad ones, so I only had  about 15 or so useable frames.

First I will share my Hα and Oiii 2 color image.  Hα is red, Oiii to green and blue...


I really like the look of these 2 color images over RGB sometimes, and this is one of those times.

I also did a Hubble palette in which I mapped the Sii to red, Hα to green and Oiii to blue.  Interesting as to the dispersal of the different elements.  Seems as tho all 3 are present in the core but look what happens as you move away from the core.

Lots of oxygen below the core, hydrogen and some sulfur especially to the left.  I'm going to have to do a full frame Hubble palette image of the entire nebula sometime!

Saturday, November 30, 2013

A Productive Evening

Winters in Ohio are a tradeoff.  You get a lot more telescope time in the evening, but it's not clear out very often.  Tonight was actually mediocre, I guess the correct term would have been 'mostly clear'.  We had a little bit of decently transparent skies, but most of the time, there were thin high clouds overhead.  Fortunately they weren't so thin that it prevented me from imaging.

The first object was something I had imaged before with the Canon T3 a year ago.  The Canon really did a good job with this object, and I dont think this image is really any better, but it served as a warmup to better things to come later in the evening.

NGC891 which has been called 'The Outer Limits Galaxy', due to it being part of the opening credits in the TV show, The Outer Limits.  It is a galaxy that is located about 30 million light years away in the constellation Andromeda.  It is a spiral galaxy viewed edge-on, and is thought to resemble the Milky Way if viewed from this angle.  The size and brightness is about the same, and the Milky Way has a dust lane similar to this galaxy.

This was imaged with the Orion Starshoot G3 monochrome behind red, green and blue filters, 5 of each.  No luminance frames were shot because there were clouds moving in at the time this was finishing up.   I actually thought my night was going to be cut short, but a half an hour later, the sky cleared.

When NGC891 was finished, I slewed the scope towards Jupiter and came inside to process the above image.  I happened to look up at the VPN screen of the laptop, and I could see Jupiter on the edge of the autoguider, saturating the screen.  I centered the object, threw in the barlows and the webcam and shot a couple series of Jupiter.  Trouble is, I shot them too dark, so they were a bit noisy.  I did get some decent stacks, this one being the best:

It didnt turn out too bad actually.  I had wished that I had taken this at the correct exposure, it really would have been exceptional, but its not a BAD image.

When I finished up taking Jupiter, I noticed that Orion was clearing the trees.  I threw in my hydrogen alpha filter in the CCD and skewed over to the Horsehead, IC434.  IC434 is much dimmer than I thought.  I've imaged this a number of times, wide field with the DSLR, but never imaged it in Hα.  What a treat this turned out to be!  I framed it using a 2X drizzle at 60 sec exposure, rotated the camera to get more of the nebula in the frame and went ahead and shot 5 - 10 minute exposures and 1 15 minute exposure.  10 minutes really isn't enough exposure time for this object - it really is pretty dim.  15 minutes is better, and even longer exposures wouldnt be a bad idea either.  I honestly can not figure out how people have been able to see this through an eyepiece!  It really is a dim object.

When I stacked this, I was blown away at the detail.  I think I was a little bit out of focus too (not much tho).  The detail in the ionized hydrogen was more than I expected.

I was so impressed with this image, that I thought I would go with a 2nd processed picture, not quite so bright, and add star spikes to the brighter stars in the field.  I did the spikes in a separate layer and changed the opacity so as to not overdo the spikes.  I think this image is really pretty.  This might be one I may just have printed.  Trouble is, I didnt drizzle this image, but perhaps a bicubic resize will look good.


Well, there you have it, a good night of imaging.  I wish we had more of these, but it might be clear again tonight, and if it is, you might see another post tomorrow.  Until next time....  Clear Skies, all!


Wednesday, November 27, 2013

A Couple Forgotten Images

I forgot, but I also was able to capture a couple objects that I had forgotten about.  The first image is a deep M57, the Ring Nebula in Lyra.  I imaged this using 15 minute frames, and was able to capture the outer halo. 

This image was done in narrowband, Hα and OIII, with the Hα mapped to red and OIII mapped to blue and green.  The Hα was stretched slightly to help bring out the outer halo, but it was obvious in the raw unstretched frames.  I took this image on 9/18/2013.

The other object I would like to share was taken on 10/27/13.  This object, NGC206 is a star forming region and cluster located within the Andromeda Galaxy.  Taken with the CCD with no filtering, the area of interest is just left of center.  The galaxy core is off the screen towards the bottom right.  Some stars are resolved in the cluster.  Not bad for resolving stars 2.5 million light years away....


This was imaged with no filters, so it is black and white.  I didnt care as far as how pretty the picture was, I was more curious to see if I could image this object with any detail.

Sunday, October 20, 2013

Latest Images

OK, I admit it... I've been bummed because of the weather we've had for much of the summer.  I have been imaging, but perhaps once every couple of weeks.  Either its just been cloudy, or the evenings have started out cloudy and cleared late at night, and I've just been too tired to do anything with the scope.  I like to set up before the sun goes down, but if it's cloudy, I dont bother.

We have had a few good nights, and I've gotten pictures that I've been too lazy to post here.  This is one reason I put up the facebook page - you'll see many pictures just hours after I take them.  The blog usually goes into more detail about the objects that I image, so the two kinda go hand-in-hand.  If you have a facebook account, I suggest you like the page that that is linked on here to get the full story and a sneak preview of what I'm doing.

Now on with the images I've missed...

First, I'll start off with a Hubble Palette of NGC7380, the Flying Horse Nebula.

This is the one and only image that I've taken using  Oiii, Hα and Sii.  Sii is mapped to red, Hα to green and Oiii to blue.  all 10 minute exposures, 5 each.  This was imaged on 9/5/2013.

A little earlier (8/23/13) I imaged NGC7635, the Bubble Nebula in Cassiopeia.  I also did this in narrowband using 10 minute exposures.  This was shot in Hα and Oiii only.  I created 2 images, one a "realistic" and a false color version.


Here is the "Realstic" version, Hα mapped to red and Oiii mapped to blue and green.


The false color image, with the Hα mapped to blue and Oiii mapped to red and green with different histogram stretching applied to the red and green.  I also took a few star cluster images that evening, but there was haze, and the clusters were far to the south, and were not real impressive.

On 9/10/13, I got an impressive Hα of NGC6888, the Crescent Nebula.  I imaged this one before using 5 minute subs, but this time I used 10 minute subs and the image showed far more nebulosity.


I'm VERY happy as to how this one turned out.  It is one of the deepest images that I've seen of this object.

Then, on 9/28/13, I went to an astronomy club meeting, and the weatherman called for clear skies, so I imaged the Helix Nebula (NGC7293) with an audience present.  This one came out very nice also.


This too has been in narrowband.  Hα mapped to red, and Oiii to Green and Blue.

Also imaged Jupiter on a couple of occasions when the sky cleared late.  this was the best one.....


I have yet to get the more interesting side, showing the Great Red Spot.

Oh, and on 10/1/13, I imaged NGC6946, the Fireworks Galaxy which came out pretty good using LRGB.

On 10/18/13 a penumbral lunar eclipse occured, of which I got a picture towards the tail end of the event.  Note the bottom right is slightly darker, and the moon has a yellowish tint.  I did no color enhancement, only a little sharpening in Photoshop.  I took this using the Canon T3 and 70-300mm zoom at 300mm, f/9.


OK, I think this brings us pretty much up to date.  I did do some imaging, but not a great amount, being this post covers about 2 months or so.  The weather hasnt been that great, a clear night here and there, and its been like that all summer.  I hope this winter, this trend changes.


Monday, August 12, 2013

Messier 17

The Swan Nebula, or the Omega Nebula, depending on its orientation.

Imaged it using LRGB, first time in doing so.  However, I was running out of time, as clouds were moving in.  The evening I imaged this, I first took a set at Oiii, which was not my intent, so I had to start again using Hα.  The image consists of 1 hour of Hα luminance, and only 10 mins each RGB color.


I found it very difficult getting the colors right.  The bottom image was a second attempt, although some like the top one better.

Sunday, July 28, 2013

M16, Hα & Oiii

I've imaged M16, the Eagle Nebula last year with the dslr.  This time, I used the CCD with Hα and Oiii.  If I had a Sii, I could have dome a hubble palette.  There was very little Oiii signal in this object.

Scope:    Celestron C6N
Mount    Celestron CG5
Camera  Orion Starshoot G3
Filters    Celestron Oiii, Orion Hα 7nm
Exposures  5 X 5 minute Ha, 6 X 5 min Oiii
Processing  Deep Sky Stacker, color combining and post processing in Photoshop CS5


This is the original size of the image put out by this camera.

If  I were to image this again, I think I would do an RGB with an Hα luminance.

Although this is a low resolution camera, I like imaging with this over the DSLR, as the exposure time is much less.  The sensitivity is much better than the DSLR.  The vignetting is almost nil, and with the exception of about a dozen hot pixels, the noise is way better.  I could never have taken a picture this clean with a total of 10 frames with the DSLR's, let alone get the fainter nebulosity on the bottom of the image. 

The following is the monochrome Hα image.

No brightening of this image was performed.  Noise reduction in the dimmer areas was done, and the star sizes were made slightly smaller, but generally, this is what I ended up with coming out of DSS.


Sunday, July 21, 2013

M82 with the CCD

I imaged M82 the other day, when it was rather low in the northern sky.  It was cloudy to the south, where I wanted to image.  Ursa Major was totally in the clear, so I thought I'd give it a try.


I imaged this using Ha for the red channel, and wideband green and blue to fill in the other colors.  The Ha was unaffected by the light pollution, as I was able to easily pick up the starburst region which I have never gotten before. The star spikes are artificially added using Carboni's astro tools.

What is interesting with the CCD is that very little post processing is required after these images are taken.  Very little histogram stretching is required.  The hardest part is combining the colors properly, but the detail appears pretty much as you see it here, after the channels are combined.  With the dslr, I'd have to stretch the histogram massively to get this, and even then, the starburst area does not show up.

I really need to take notes on the next DSO I image and write down the post processing workflow.  You wouldnt believe how simple it is, once the colors are combined and corrected, however, because the color levels are never correct when theyre taken, its difficult to know when they're right. 

To summarize, when Iprocessed this, I combined the colors, got rid of the nasty gradient on the green and blue, because of the light pollution, got the color balance close.  Did some very minor histogram stretching, a little bit of noise reduction.  Reduced the star size... sharpened, and here it is....

This is the unprocessed Ha stack with the only modification being done was to set the black point.  This is a stack of 5 frames.  No noise reduction, no histogram stretching...This is just as you see it coming out of DSS, except the black point was set in photoshop.  This was used as my red channel in the above image.

Wednesday, July 3, 2013

M27 Narrowband

If I ever needed proof of the difference in image quality one gets with a dedicated CCD vs a dslr, this has to be it.  I imaged in 2 colors, 8 3 minute frames per color (Ha and Oiii), mapped the Ha to red and the Oiii to green and blue.  The amount of stretching in photoshop was nil - just a wee bit to bring out the edges, but for the most part, this is how bright this appeared on the capture screen.


If that werent enough, I didnt stop there.  I re-mapped this into a Hubble Palette version.  Even more detail is visible!


Not bad for a 2-color image.  This narrowband stuff is turning out to be too much fun!  I still cant get over the fact that I did this with about 45 minutes worth of camera time.

This is a picture of last year's M27 taken with the dslr. 

Although not a BAD image, there was a lot of image stretch to bring out the fine detail, and lots more imaging and processing time.  Of course, this is a standard RGB using the dslr. 

Thursday, June 27, 2013

Narrowband Imaging the Crescent Nebula

Received my Hydrogen Alpha filter yesterday and we got lucky and had a couple hours of reasonably clear sky.  Although I didnt get as many exposures as I'd liked, my first real attempt at narrowband imaging was a success.  I imaged 2 objects - the Ring Nebula (M57) and NGC 6888, the Crescent Nebula in Cygnus.  The Ha frames that I took of the ring were washed out possibly due to clouds, but the Crescent came out just fine.  

I have never before gotten this much detail on this object before.  In the past, I was able to capture the bright outline with a tiny amount of  the inner nebula.

The above image consists of only 25 minutes of H Alpha and 25 minutes of O3.  Ha was mapped to red, Oiii mapped to green and blue.  I used the Ha stack as the luminance.  This was done with my light polluted backyard, and the Oiii was taken during the last full, supermoon.

Saturday, June 22, 2013

Narrowband Imaging

When I bought the G3 at Cherry Springs, I also bought an Oiii filter.  I wanted a Ha filter, but he didnt have any.  I ended up ordering one from Orion last week.

I figured theres no reason to wait for the Ha to come in to start taking narrowband images.  The moon was shining brightly, on its way to become the supermoon which is to occur tonight.  I took this image on 6/19/13 of M97, the Owl Nebula through the O3 filter.

There is some nice detail in this image.  Planetary nebulae are perfect targets for this wavelength filter. 

There is very little Oiii emission in the Crescent Nebula, as seen here...


Note that these were taken under a bright moon.

I'm really looking forward to imaging the crescent with the Ha filter when it arrives.

Sunday, June 16, 2013

M63 LRGB with the Starshoot G3

Finally, I had a good clear night and had enough time to image something properly with the Starshoot G3.  This time, I thought I would shoot a galaxy, and I chose M63 because it is a tightly wrapped spiral with a lot of fine detail.  Although this object would fare better using the 8 inch, being I'm still learning how to use this camera, I used the 6 inch.  The 8 inch's field of view with this camera is substantially smaller, and I really didnt want to mess this up with tracking and framing problems.

The 6" still showed quite a bit of detail.  I might have done a little better with more, shorter exposures, as the core is blown out.  However, I got the fainter extreme outer regions nicely with these 5 minute subs.

This was my first processing attempt.   These images are much more difficult to process.  I do believe however, that this camera is the way to go for smaller objects.

This next image was restacked, and reprocessed.  I took 20 dark frames and was able to go a little deeper.

I may have lost a little detail in this one, but I like the color better, and I got a little more of the outer regions of the galaxy.  I cannot figure out why the images are flipped vertically.  I didnt flip them, but I noticed in Fits Liberator, some of the frames were flipped and some were not.  I dont recall the exact processing workflow I used when producing these, so it might have something to do with the original fits files.

Tuesday, June 11, 2013

M57 Color using the Orion Starshoot G3

Last night, 6/10/13 we had a short period of clear sky, so I set up the 6" Celestron Newtonian and attached the Starshoot G3 and imaged until the clouds blew in.  This is the first color image so far which I was able to take with the new camera.  The image consists of 5 frames each, through blue and red filters.  I did not have time for a set of green exposures, so I used the "Synthesize Green from Red and Blue" tool in Noel Carboni's Astronomy Tools.

I still have to work on these images.  Just like with the dslr, when I began imaging with it, the images werent great.  Although the ring looks nice, I think theres a bit too much blue, as all of  the stars are blue.  Once I get clear skies long enough to image something using all 3 colors, I think the images should improve.

The camera appears to do a decent job, really.  The stars are smaller than they would be using the dslr, especially on small objects.  I am happy with the resolution, even though the max resolution is on the order of 752 X 582 pixels. 

Cherry Springs Star Party 2013

I attended the Cherry Springs Star Party 6/6 - 6/9/13.  Actually arrived Tuesday night, 2 days before the start of the star party.  Tuesday had the best skies of all of the evenings I was there.  Wednesday night, clouds rolled in, and it rained all the way thru Friday.  Saturday night the sky was clear again, but the humidity caused a very heavy dew to form.

While I was there, I bought my first real CCD, an Orion Starshoot G3.  I actually wanted a small chip for smaller objects.  Although I tried it out Saturday night, and was cut short due to the extreme moisture, I was able to shoot the Ring Nebula thru a red filter.  I only shot 5 frames, and I was shocked as to how quiet the image was.  Although the image is monochrome, the detail was quite good.


All images were shot with the Orion 8", f/5.  This image of M57 were shot with the Starshoot G3 thru a red filter.  Exposure length was 180 seconds.  This was shot on Saturday night, 6/9/13.

The Tuesday night images were all shot with the unmodified T3, as I left the power supply at home for the 300D.

M101, an object that I have problems with at home due to the light pollution, came out much better when I was able to use 5 minute, iso-1600 frames.

Messier 4.  The following star clusters are too low in the southern sky for me to image at home, so I took advantage of the dark sky and low horizon to capture a few of the Messier clusters in Scorpius and Sagittarius.  This is 6 - 60 sec exposures at iso 1600.

After capturing M4, I went over to M6.  This is only a stack of half a dozen 1 minute exposures.

 M7 is right near M6, so I thought I'd get it next.  4 - 60 sec frames, iso-1600.

Lastly, I shot M22.  This consists of a dozen 1 minute frames, also at iso-1600.


Saturday, June 1, 2013

Messier 51

This is not the first time I've imaged this one, but it is the first time I was able to image this deep.  Last year, 2 minute subs were my limit.  Now I can shoot 2.5 times in frame duration, and it certainly makes a big difference.

Here is 50 minutes worth of exposures:


And here is the above data plus data taken the next day. - Total of 22, 5 minute frames.


Notice the dimmer areas show up better.

I've noticed that the longer each frame is, the more detail, and the dimmer detail is captured.  The number of frames makes a difference, but not nearly as much as the exposure length.  These experiments should assist me when I begin shooting exposures at Cherry Springs next week.  Lets hope for clear skies.  As of right now, the best they are calling for is partly cloudy.

One more image, using both days but cropped in such a way to enlarge the galaxy:

This image appears to show more detail in the body of the galaxy, but the noise is more apparent in the fainter areas. 

Monday, May 27, 2013

Couple Globular Clusters

Had the scope out during a full moon.  Hey - it was clear!  Wanted to image something other than a full moon, so I settled on a couple globular clusters.  Glad I did these, they came out quite good.

First, a 5o short frame image of M13 in Hercules.


After M13, I slid over to Canes Venatici and shot M3.


Looking forward to my 2nd trip to Cherry Springs in a little over a week.  Was getting the pump primed for some spectacular imaging from there provided the sky is clear!

Sunday, April 28, 2013

Saturn Near Opposition

Most of the night of 4/26 was wasted, as the camera inadvertently shut off or lost power after inaging for about 3 hours worth of deep sky objects, but I was able to capture Saturn a day before opposition.  The rings were bright enough to see the C ring, which I later enhanced to make it more visible.  Seeing was rather poor, the planet was bouncing and dancing on the preview screen.  I am surprised how well the pictures came out under such conditions.

Saturn - original stack

This was what I got directly from Registax.  You can see the C ring in this image.  The next day, I loaded the image in Photoshop, flipped the image so north is on the top, and I also enhanced the dark areas, to enhance the C ring.

Satern enhanced
Enhancing the C ring also seemed to sharpen it up somewhat.