A few days ago, I imaged 168P/Hergenrother and today I created a time lapse video using the frames I had stacked to produce the image I created a still with. Deep Sky Stacker for some reason didnt like the comet too much, as it still tried to leep the stars round. I therefore attempted a time lapse video using the 21 frames I had taken.
It really wasnt as difficult as I thought. I'll explain what I did to create the video.
First, I opened the frames in Deep Sky Stacker. I used no darks or flats, although one could use calibration frames. I just chose not to use any. There is a setting in DSS to "Create a registered / calibrated file for each light frame. Its located in Settings > Stacking Parameters > Intermediate Files.
I let DSS stack, and it added a tiff of each light frame in the source folder. When DSS was done, i discarded the stacked image and closed DSS.
I then opened photoshop and loaded the first frame in it. Created a new action. I ran some simple processing - curves and levels, some sharpening - nothing too complex, cropped, and finished by saving as a jpg. The cropping works because the frames are all aligned.
I then ran a batch process on all of the frames using the action I created. It created a numbered sequence of jpg's, all cropped and nicely enhanced.
I moved all the finished jpg's to a different folder. Then I loaded the first jpg in Virtual Dub. It made a video out of all the files in the folder. I copied the frames several times back to back, appending to the original video, so the sequence repeats 6 times in this video. Set the frame rate for 10FPS, so it will run slow enough to see it move, but not so slow for it to chop.
After it finished, I uploaded the video to youtube and ended up with this:
Now you know how to create an aligned video of a small celestial object. This method should work for small objects, such as a distant comet, the outer planets, or possibly an asteroid as it moves thru space among the stars. The longer the imaging session, the farther the object will move. Being this video was experimental, the number and duration of the imaging was really too short to do a project such as this. I didnt even think of doing a video until someone from my local club did the same thing with a 3 hour duration. Theirs came out really cool, so I thought I would see if I could figure out how to do it, and I'm pleased with the results. I want to do more of these using images of other objects.
clear sky chart
Sunday, October 14, 2012
Friday, October 12, 2012
Recent Images
We've had a few clear nights in the past couple of weeks and when conditions are good, I'm outside with the telescope and cameras. I'm going to share a few here, as my facebook friends all seem to like what I've taken.
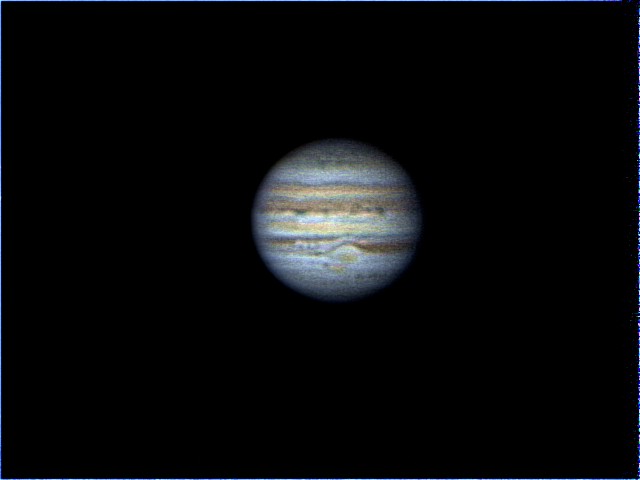
 This image of Jupiter was taken on October 1 at 0926Z. Seeing appeared to be pretty decent, but a little bit of coma was detected still during a star test around the time this was taken. I had just had the optics adjusted with a laser collimator, but I have yet to fine tune on a star before this was taken. I have since tuned out the remaining coma, but I have not has the chance to image Jupiter again after this was taken.
One week later, on 10/8, I imaged the Iris Nebula. It seems that everytime I've imaged this object in the past, its always been done during a bright moon. This time I imaged it on a moonless night. It seems there is a bit more nebulosity than I've captured previously.

After imaging the Iris, I thought I'd take a crack at Andromeda. I did not spend a lot of time on this, but it seemed to come out pretty decent.

On 10/9 I imaged 2 emission nebulae. The first is the Wizard Nebula, NGC 7380 in Cepheus. NGC 7380 is actually an open cluster, but it is surrounded by nebulosity.

This is a very dim object. I am surprised to have gotten anything at all from my light polluted sky. I used 3 minute exposures at iso 1600 with the Digital Rebel on this one.
Just after imaging the Wizard, I thought I'd try the Pacman Nebula in Cassiopeia. This image fared a bit better.

Although not as deep as I probably could have gotten with 3 minute shutter, I switched back to 2 minutes after imaging the Wizard. I just wasnt sure what kind of quality I was getting with the 3 minute exposures. I will have to attempt 3 minute exposures on this one sometime.

Then on 10/11, at 5AM I imaged the Horsehead again. I wanted to see the difference between what I could get at home versus what I got from Cherry Springs. I was surprised actually when I processed this one, as there really wasnt that much difference. I just wonder how much better my Cherry Springs image would have been had my mount been working properly.
Sunday, October 7, 2012
The Triangulum Galaxy (Messier 33)
Among some of the images that I took from Cherry Springs was an under exposed image of M33. There were a number of images I wasnt happy with, but after working on the image some, and using calibration frames that I made after the fact, I was able to produce this image of M33.

I spent several hours processing this image, and I think it paid off. Most of the frames (30 or so) were only 1 minute frames. The only things I had going in my favor is that for a galaxy, this one is on the bright side, and I had the dark skies at Cherry Springs.

I spent several hours processing this image, and I think it paid off. Most of the frames (30 or so) were only 1 minute frames. The only things I had going in my favor is that for a galaxy, this one is on the bright side, and I had the dark skies at Cherry Springs.
Tuesday, September 25, 2012
Reporcessed Cherry Springs Photos
OK, the past week, I reprocessed some of my photos I took the week before at Cherry Springs. I knew I could get a little more out of the Horsehead, and also got rid of most of the nasty gradient along the top.

I also reprocessed M42, and did MUCH better with it. The one I posted earlier was way over exposed. This one used about 15 - 1 minute frames, and some 8 second frames of the core.

And last but not least, I re-did the Andromeda Galaxy. Think I got the colors better this time.

Think I improved on all 3. Seems I've had more detail on Andromeda in the past, so I'm not certain whats up with this one. I think it was also over exposed. Overall, the images are better this time.
Saturday, September 15, 2012
Cherry Springs
Spent a week at Cherry Springs to image the sky under pristine conditions and I've learned a lot due to my own inexperience. Let me give you some tips before you start imaging from a site 4 hours away...
1. Make sure your camera settings are right. Mine was set to iso 400, and the first 2 days were almost spoiled because of it.
2. Image deep. Keep the shutter open a long time. This requires an autoguider, which I dont have. I'm not going back there again until I have one.
3. Use a high iso. I found that iso 1600 on my digital rebel did a fine job. I've never imaged at 1600 with that camera before because it was maxxed out at that setting.
4. Darks, Flats and Bias frames matter even more under dark skies. Take a good set and use them!
Now I imaged about 15 or so objects, and because of stupid mistakes, some didnt come out too good. I did have some good pictures though, and I'll post the best ones here.
Although I've seen wide field images of the Milky way that are far superior to mine, I thought mine came out pretty decent, as I've never been able to really image it before. Here's mine, looking at the core of the galaxy.

Next is the Deer Lick Galaxy Cluster. I used the 1100D on both this and the Milky Way above.

I also imaged the core of the Andromeda Galaxy, which I'm not sure if I like or not, but I'll post it anyway...
 The color isnt right on the edges, which I'll take care of one of these days.
 This is the Triangulum Galaxy, and it didnt come out as good as I expected. I can probably do better from home.
 Here's the bubble, taken at iso 1600. Not great, but its ok....
 M42, and I'm not sure what went wrong with this one, I've done so much better last year.
Now the next 3 images made the trip worth while. First is the Helix Nebula, which I doubt I'd be able to get nearly this good from home as it is so low in the sky.

The Pleiades is incredible from Cherry Springs!

And then, theres the Horse Head and Flame Nebula, which I've tried to get last year, but this one rocks in comparison...

Last but not least, I also imaged the Trifid. It is about the same as the one I took a couple months ago...

So, did I waste my time? I dont think so. After fixing some stupid mistakes, I got some decent images. Next time however, I'll be guiding, and I'll also get deeper and more numerous frames of each object. Trouble with going to a site like that is that you want to get as much as you can, trouble is, one can easily get ahead of himself and try to do too much. I believe if I had gotten say 50 frames of each object, my images would have been far better.
Also, I have to mention, they had a star party there the weekend we left. Participants came early, and was kinda crazy. I didnt know about the star party or I would have registered, therefore, I didnt attend the event.
1. Make sure your camera settings are right. Mine was set to iso 400, and the first 2 days were almost spoiled because of it.
2. Image deep. Keep the shutter open a long time. This requires an autoguider, which I dont have. I'm not going back there again until I have one.
3. Use a high iso. I found that iso 1600 on my digital rebel did a fine job. I've never imaged at 1600 with that camera before because it was maxxed out at that setting.
4. Darks, Flats and Bias frames matter even more under dark skies. Take a good set and use them!
Now I imaged about 15 or so objects, and because of stupid mistakes, some didnt come out too good. I did have some good pictures though, and I'll post the best ones here.
Although I've seen wide field images of the Milky way that are far superior to mine, I thought mine came out pretty decent, as I've never been able to really image it before. Here's mine, looking at the core of the galaxy.

Next is the Deer Lick Galaxy Cluster. I used the 1100D on both this and the Milky Way above.

I also imaged the core of the Andromeda Galaxy, which I'm not sure if I like or not, but I'll post it anyway...


Now the next 3 images made the trip worth while. First is the Helix Nebula, which I doubt I'd be able to get nearly this good from home as it is so low in the sky.

The Pleiades is incredible from Cherry Springs!

And then, theres the Horse Head and Flame Nebula, which I've tried to get last year, but this one rocks in comparison...

Last but not least, I also imaged the Trifid. It is about the same as the one I took a couple months ago...

So, did I waste my time? I dont think so. After fixing some stupid mistakes, I got some decent images. Next time however, I'll be guiding, and I'll also get deeper and more numerous frames of each object. Trouble with going to a site like that is that you want to get as much as you can, trouble is, one can easily get ahead of himself and try to do too much. I believe if I had gotten say 50 frames of each object, my images would have been far better.
Also, I have to mention, they had a star party there the weekend we left. Participants came early, and was kinda crazy. I didnt know about the star party or I would have registered, therefore, I didnt attend the event.
Saturday, September 8, 2012
Jupiter & the Great Red Spot
Recollimated the scope in anticipation of my trip to Cherry Springs next week, and thought I'd test it by imaging Jupiter. The Great Red Spot would be visible on 9/6, so I got up at 5AM and shot some AVI's.


The little black dot below and to the left of the redspot is the Oval BA.


The little black dot below and to the left of the redspot is the Oval BA.
Subscribe to:
Posts (Atom)